Today I want to walk you through the gear that actually makes a professional duct cleaning look, feel, and test like a professional duct cleaning. Not gimmicks, not shortcuts—just the equipment and accessories that let you clean thoroughly, control dust while you work, and walk away with before-and-after proof you’re proud to show. You might be surprised by how much the right setup improves your results, your reviews, and your like testiminials stay tuned
What You’ll Learn
What you’ll learn here is simple and practical. By the end, you’ll understand the main categories of professional air duct cleaning equipment, the must-have accessories that keep jobs clean and efficient, how to match your tools to any job (metal vs. flex, light dust vs. heavy buildup, residential vs. commercial), what realistic pricing and packages look like in 2025, how pros finance their setups and track ROI, the training and certifications that keep you compliant, and the exact FAQs both technicians and customers ask most often. Think of this as your field guide, written by someone who’s hauled the hoses, swapped the filters, and knows what works when you’re staring down a long trunk line.
Why Invest in Professional Air Duct Cleaning Gear?
Why invest in professional air duct cleaning gear? Because the returns are real, the start-up cost is lower than you think, and the add-on opportunities are everywhere. With a smart “starter kit,” many pros pay off equipment in months, not years, especially when they bundle dryer vents, coil cleaning, and simple IAQ upgrades. Duct cleaning is also a terrific lead generator. Once you’re inside the HVAC system, you naturally uncover filter issues, leaky returns, insulation problems, and airflow restrictions—each one a chance to deliver value and grow the ticket ethically. If you’re in HVAC, restoration, facility services, or even carpet cleaning and looking to expand, this is a service line that ties in neatly with what you already do.
Core Categories of Air Duct Cleaning Equipment
Let’s talk core categories, because understanding these is half the battle. First up: HEPA-filtered vacuums. What do I mean by this? Portable vacs designed to capture fine particulates at the point of work—around registers, coils, air handlers, and access openings—without puffing dust back into the room. The key phrase to look for is true HEPA: 99.97% at 0.3 microns in a sealed system. That “sealed” part matters; if the cabinet or filter seating leaks, you’re just moving dust around. When you use a proper HEPA vac, you’ll notice cleaner work zones, less cleanup at the end, and fewer callbacks from dust settling on furniture. Heads-up here: if you see “HEPA-like” or “HEPA-style,” that’s marketing, not performance.
Negative Air Machines and Air Scrubbers
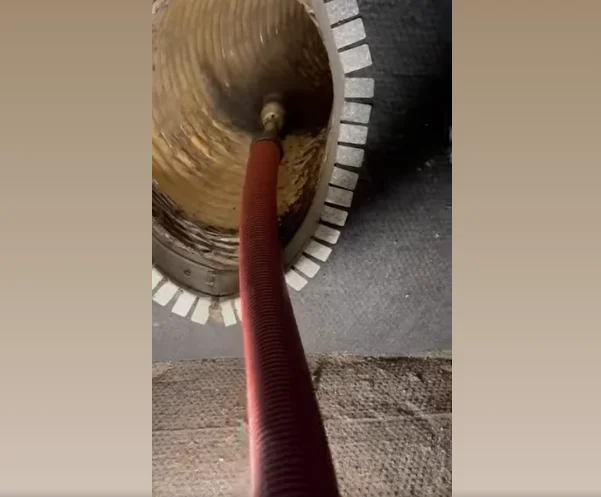
Next, the lungs of the job: negative air machines and air scrubbers. A negative air machine connects to the ductwork—usually via 8 to 12-inch hose—and pulls debris toward the filter while you agitate inside the ducts. An air scrubber, by contrast, recirculates room air to catch airborne dust while you work. Both often share similar filtration stacks, but they do different jobs. The negative air unit is what keeps loosened debris flowing in the right direction so you aren’t blowing dust back into the home. You want strong airflow and solid static pressure capability, multiple pre-filter stages so your HEPA lasts, and tight connections so you don’t lose suction to leaks. When this is set up correctly, the job is cleaner, quieter, and faster, and the customer sees that you’re controlling dust instead of chasing it. A quick tip: don’t let an air scrubber masquerade as your duct suction. It’s great for room control, but you still need negative pressure inside the duct itself.
Contact Cleaning Machines and Rotary Brush Systems
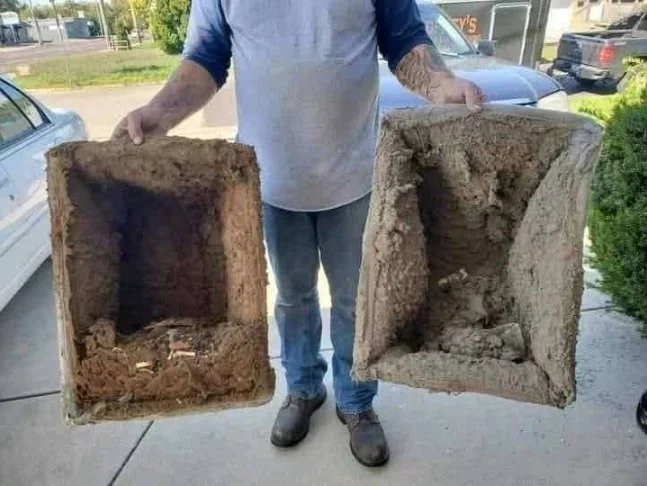
Now, the muscle: contact cleaning machines and rotary brush systems. Air alone won’t break the bond of caked dust and pet hair to metal or lined surfaces. A powered brush, paired with negative pressure, is how you actually scrub surfaces clean so the vacuum can capture the debris for good. This is where variable speed control and the right brush head for the material make all the difference. Metal ducts can handle a firmer brush; flex and internally lined ducts need softer, gentler contact. Get this right and you’ll see those satisfying before-and-after shots from every branch, not just the first five feet behind the register. Get it wrong, and you risk scuffs or tears in delicate flex. Use the right tool for the material and you’ll be golden.
Air Whips and Skipper Nozzles
To chase the fines and clean the corners, you’ll want air whips and skipper nozzles driven by a clean, oil-free compressor. After brushing loosens the heavy stuff, whips with multiple tentacles and reverse-flow nozzles help “sweep” dust and hair back toward your collection point, especially in long horizontals, boots, and transitions. The air matters as much as the tool—dry, filtered, oil-free air keeps you from pushing moisture or compressor oil mist into the ducts. If you’ve ever seen clumps that won’t budge, a whip in practiced hands is usually what breaks the stalemate.
Dryer Vent Cleaning Machines
Dryer vent cleaning machines deserve their own spotlight because they’re fast, high-margin, and deliver obvious safety benefits. These use flexible rods with either a soft brush or an air-driven skipper ball to remove lint from 3–4-inch runs. It’s a simple add-on to every residential duct job and a strong standalone service as well. Customers appreciate shorter dry times and lower energy bills. You’ll appreciate that most vents clean up quickly—as long as you check for crushed flex, improper foil connectors, or blocked terminations before you start.
Insulation Removal Vacuums & Blowing Machines
Another powerful pairing is insulation removal vacuums and blowing machines. Why bring attic gear into a duct guide? Because a dusty, contaminated attic is often the source of the dust you find in returns and plenums. When you can remove soiled insulation, sanitize where appropriate, and install fresh insulation, you’re addressing the dust reservoir feeding the system and increasing the project value. These machines move a lot of material quickly, so you want abrasion-resistant hoses, collection bags rated for insulation, and a clear plan for handling any rodent contamination. If you suspect vermiculite or asbestos, stop and test—no exceptions.
Commercial/Industrial Vacuums (Non-HEPA)
On larger projects, it’s handy to have access to commercial or industrial vacuums that aren’t HEPA, simply to move bulk debris during demolition or pre-clean phases. Think of these as the rough cleanup helpers, not the finishers. They should have strong water lift, durable hoses, and large capacity, sometimes paired with a cyclone separator to keep filters from clogging too quickly. You never end a job with these; you still finish under negative pressure with true HEPA so you’re not leaving fines behind.
Mold and Flood Remediation Equipment
Sometimes the job isn’t just dusty—it’s wet or was wet recently. That’s where mold and flood remediation equipment enters the picture. Low-grain refrigerant dehumidifiers, air movers, moisture meters, and HEPA air scrubbers work alongside duct cleaning when a property has water damage or microbial growth. The watchword here is standards. Follow IICRC S500 for water damage and S520 for mold, and remember that source removal comes before any treating or coating. Porous duct materials that are water-damaged or mold-colonized may need replacing instead of cleaning. It’s better to do it right than to fog and hope.
Smoke, Dust, and Fume Extraction Units
Finally, in facilities work and certain restoration scenarios, smoke, dust, and fume extraction units come into play. These are portable extractors with true HEPA and often activated carbon stages that pull welding smoke, wildfire residue, or fine particulates from the air right at the source via articulated arms or long hoses. They’re not a substitute for a negative air machine inside the duct, but they’re excellent companions for keeping job sites breathable and odors in check while you work around the system.
Must-Have Accessories and Containment
Let’s not forget the unglamorous gear that keeps everything tidy: access and containment. A clean, efficient job depends on simple, thoughtful accessories—gasketed, code-compliant access panels that you can install and reseal without leaks; magnetic vent covers and foam plugs to control airflow and keep debris from drifting into rooms; seal-off bags for plenums; quality 8–12-inch flex duct with tight cuffs; a reliable borescope or inspection camera for proof and planning; a manometer to confirm you’re pulling negative pressure; and practical consumables like foil tape, mastic, drop cloths, zipper walls, and labels so the next tech knows exactly what was done. Add an oil-free, dry compressor, a full set of brush heads matched to metal, flex, and lined duct, and a selection of air whips and reverse nozzles, and you’ve got a setup that handles just about anything you’ll run into.
How to Choose the Right System for Any Job
So how do you choose the right system for any job? Start by looking at the duct type and condition. Metal trunks with years of buildup may call for a stiffer rotary brush followed by an air whip flush under strong negative pressure. Flex runs respond better to softer brushes and gentler agitation so you don’t damage the inner liner. Lined ducts require even more care: use soft tools, favor air-driven agitation, and follow NADCA’s ACR guidance to avoid tearing or scouring the liner. Then consider length and complexity. Long horizontals, multiple transitions, and tight turns push you toward higher static pressure capability in your negative air machine and flexible rods that can navigate without binding. Don’t forget contamination type. Post-construction fine dust behaves differently than pet hair mats or rodent droppings, and smoke residue needs different expectations for odor control. Finally, plan for proof. A quick set of before-and-after photos from the same spot and a manometer reading that shows you maintained negative pressure go a long way toward building trust with clients.
Pricing and Packages (2025)
If you’re wondering what this all costs in 2025, here’s the honest picture. A solid starter kit that covers residential work typically lands between eight and fifteen thousand dollars. That usually includes a true HEPA negative air machine in the $2,500 to $6,000 range, a rotary brush system around $1,500 to $3,500, air whips plus a clean, oil-free compressor between $800 and $2,500, a portable HEPA vac for $600 to $1,800, and the “brains and polish” pieces—camera, manometer, access panels, hoses, seal-off gear—another $1,000 to $2,500. If you plan to tackle light commercial or want extra capacity and options like additional air scrubbers or insulation vacs, expect to add ten to thirty thousand dollars depending on size and feature set.
Job Pricing and ROI
What do those numbers look like in practice? Most residential full-system cleanings price between five hundred and twelve hundred dollars, depending on system size, access, and condition. Standalone dryer vent cleaning typically runs one twenty-five to three hundred, and as an add-on it’s often seventy-five to one fifty. Post-clean sanitizing or deodorizing, when warranted and done by the label with EPA-registered products, is commonly a modest add-on. If you handle eight to twelve residential jobs per month at an average of eight hundred dollars, many contractors cover a typical monthly equipment lease in a single visit. Consumables per job—pre-filters, tape, PPE—often sit in the twenty to sixty dollar range. You can see how the math starts working in your favor fairly quickly.
Financing and Payback
Speaking of leases, financing in this space is straightforward. Many pros choose thirty-six to sixty month equipment leases that come in around two hundred to four hundred fifty dollars per month for a solid starter kit. Section 179 can allow full equipment expensing in the year of purchase (always check with your CPA), and bundling consumables or filter subscriptions into recurring maintenance plans helps smooth cash flow. The big-picture ROI has two levers: utilization and add-ons. The busier you keep the gear and the more consistently you bundle dryer vents, coil cleaning, and basic IAQ upgrades, the faster your payback.
Training, Certifications, and Compliance
Training and compliance aren’t the “fun” part of buying gear, but they are what keep you safe, credible, and insurable. NADCA’s ASCS certification and the ACR Standard lay out the playbook for source removal, documentation, and ethics. If you ever intersect with water damage or suspected microbial growth, IICRC S500 and S520 spell out how to assess, dry, and remediate properly. The EPA matters here too: only use EPA-registered disinfectants exactly as the label permits, and remember that fogging does not replace cleaning. On the safety side, OSHA requirements for respiratory protection (including fit testing), hearing protection, lockout/tagout, and ladder safety absolutely apply; silica rules can apply on some construction dust projects. For access, use SMACNA-compliant panels and re-seal everything you open. One last note: if you see signs of asbestos, vermiculite insulation, or lead-based dust, stop and test before you disturb anything. Nothing kills ROI faster than a stop-work order or a health incident.
FAQs Pros and Customers Ask the Most
Q1: Do you really need a negative air machine, or can a shop vac do the job?
A: For whole systems, you need negative pressure and true HEPA. A shop vac can tidy a register or a short section but won’t control dust or capture fines throughout a system.
Q2: How much airflow is “enough”?
A: You’re aiming for enough CFM and static pressure to maintain strong negative pressure at your farthest runs with filters installed, not just on a spec sheet. That’s why real-world performance and tight connections matter more than a single big number.
Q3: Brush or air whip—which is better?
A: They complement each other. The brush scrubs stuck-on debris; the whip sweeps fines and hair toward your collector and reaches corners a brush misses. Used in sequence, they deliver the most thorough clean.
Q4: Will cleaning damage ducts?
A: Used correctly, no. The key is matching tools to materials, installing proper access rather than cranking through tight grills, and sealing everything when you’re done.
Q5: How long does a typical residential system take?
A: With a two-person crew, most homes take two to four hours depending on access and contamination.
Q6: Should you fog or sanitize after cleaning?
A: Often, a great cleaning removes the odors with the dust. If you do sanitize, it should be after source removal, with an EPA-registered product, exactly as labeled for HVAC use.
Q7: Are dryer vents worth adding?
A: Absolutely. They’re quick, high-margin, and deliver a clear safety benefit customers understand immediately.
Q8: What’s the best first upgrade after a starter kit?
A: A quality inspection camera and better containment and access gear. Proof sells your work, and better control makes every job cleaner and faster.
Q9: How often should you replace filters in your negative air machine?
A: Pre-filters will be your frequent swap—sometimes every job on dusty projects—while HEPA filters last much longer if you protect them with proper staging. Keep spares on the truck so you never pinch performance mid-day.
Must-Have Tools, Accessories, and Consumables
Today I want to walk you through the “little things” that make the big difference on every job—the tools and consumables that keep you efficient, keep the home clean, and give you proof that the system is truly clean. These are the pieces that turn a good setup into a great one.
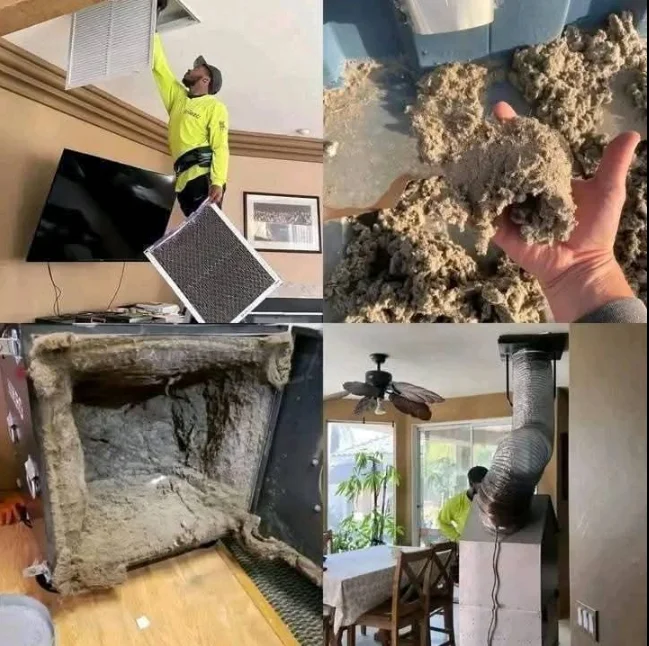
Video Inspection Cameras and Duct Cameras
Seeing is believing. A solid inspection camera lets you assess before you start, confirm you reached every branch, and document results your client can’t argue with. It’s your truth detector and your sales closer rolled into one.
- What to look for:
- Flexible, pushable cable with at least 30–65 feet of reach
- Bright, adjustable LED lighting and a lens that resists dust smearing
- Onboard recording (photo + video) and wireless display or app
- Locator/sonde compatibility if you do long commercial runs
- Why it matters:
- Targets your tool choice (brush vs. whip) so you work faster
- Prevents missed branches and reduces callbacks
- Provides before/after proof that boosts trust and referrals
- Heads-up: Wipe the lens every few minutes—fine dust cakes fast and ruins footage.
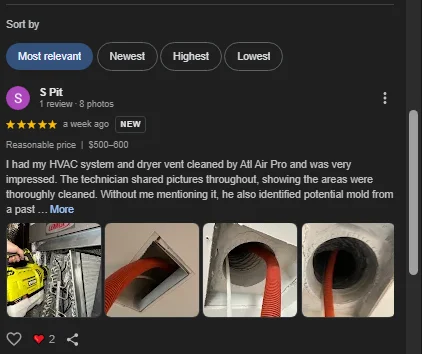
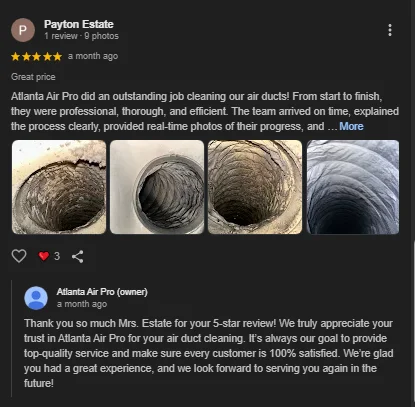
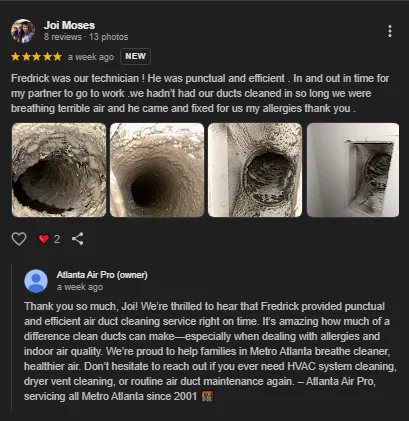
Example Gallery for Before and After Photos | Airduct Cleaning ATL
Sanitizing and Deodorizing Systems
Cleaning comes first, always. When sanitizing or deodorizing is appropriate and allowed by the label, the right delivery system helps you apply evenly and efficiently without over-wetting or overspray.
Foggers and sprayers
ULV foggers and low-pressure sprayers help distribute EPA-registered products labeled for HVAC use. Used after source removal, they can address residual odors and surface sanitization where permitted.
- What to look for:
- ULV droplet control, adjustable flow, and anti-drip tips
- Hoses/lances that reach deep without pulling you off a ladder
- Materials compatible with the chemistry you use
- Heads-up: Follow the label. Dwell times, PPE, ventilation, re-entry—no guesswork here.
Duct sanitizing systems (e.g., SaniJet)
These systems deliver a directional spray inside ducts via wands or nozzles designed to coat surfaces while minimizing overspray.
- Why techs like it:
- More targeted than fogging, less residue, better coverage on surfaces
- Easy to document which branches were treated
- Heads-up: Not a substitute for cleaning or a fix for active moisture/mold problems. Porous, contaminated duct liners often require removal per standards.
Ozone generators (e.g., OzoGen 16g/22g) — safety notes
Ozone can neutralize stubborn odors from smoke or animals, but it is hazardous to people, pets, and plants. It’s for unoccupied “shock” treatments only.
- Safety rules:
- Only in unoccupied spaces; post signage and control access
- Remove plants, bag sensitive items, protect metals where required
- Ventilate thoroughly after treatment; follow local regulations
- Heads-up: Ozone is not a cleaner or sanitizer for duct interiors and should not be used as a routine HVAC treatment. Check EPA/OSHA guidance and your insurer’s position.
Brushes and Whips
Agitation is what breaks the bond between debris and duct surfaces. The right head matched to the material is everything.
- Brush types:
- Nylon: general-purpose for metal ducts; gentle and versatile
- Tynex/abrasive: for stubborn buildup on rigid metal; avoid on flex/liner
- Soft brushes for bends/flex: protect inner liners and reduce snagging
- Sizes:
- Round brushes typically range 4″–24″ to match common circular ducts
- Rectangular combination brushes often span 8″–20″ widths
- Whip nozzles:
- Reverse six-whip: pulls debris back toward your collection point
- Triple and four-whip heads: balance aggression with control in longer runs
- Tips:
- Size your brush slightly larger than duct I.D. for effective contact
- In flex or lined ducts, favor soft brushes and air whips over abrasives
- Practice on offcuts to feel torque and avoid overdriving in tight bends
Rotary Cables, Shafts, and Button-Lock Systems
Your drive system is the backbone of contact cleaning. You want torque, control, and quick changes without downtime.
- What to look for:
- Flexible yet torque-capable shafts for long horizontals
- Button-lock or quick-change couplings for fast head swaps
- Forward and reverse drive, plus variable speed control
- Rod guides and centering devices to reduce scuffing
- Why it matters:
- Faster tool changes = more branches cleaned per hour
- Controlled torque reduces damage risk in delicate sections
Hoses, Hose Connections, and Adapters
A great vacuum underperforms if your hose train leaks. Airtight connections multiply your suction and reduce dust escape.
- Key pieces:
- 8–12″ flex duct for your negative air machine, with tight, gasketed cuffs
- Reducers, cones, and take-offs for odd openings and plenums
- 1.5–2.5″ antistatic hoses for HEPA vacs and spot cleanup
- What to look for:
- Crush-resistant hose, reinforced cuffs, and reliable clamps
- Quick-connects that hold under vibration and movement
- Heads-up: Tape is a temporary fix, not a seal. Use proper cuffs and gaskets.
Ductwork Access Panels and Tools
You can’t clean what you can’t reach. Proper access is both a quality and a safety standard.
- Panel types:
- Circular, rectangular, and hose-connection access panels
- Access door sockets for quick open/close operations
- Tools and practices:
- Hole saws and snips for clean cuts; deburr edges
- Gasketed, code-compliant panels; label and document locations
- Heads-up: Follow SMACNA/NADCA guidance. Reseal airtight—leaks hurt efficiency and comfort.
Sealing and Containment
Good containment keeps homes clean and maintains suction where you need it.
- Go-to items:
- Duct mask rolls and temporary seals for registers and returns
- Magnetic vent covers and foam plugs
- Zipper walls and drop cloths for finished spaces
- Why it matters:
- Better airflow control, cleaner rooms, happier clients
- Faster cleanup and reduced post-job dust settling
Dust Extraction Filters, Bags, and Attachments
Filtration is a system, not a single filter. Stage it right to protect your HEPA and your lungs.
- Best practice:
- Pre-filter → secondary filter → HEPA (sealed)
- Use bag liners where compatible to speed disposal
- Keep spare pre-filters on the truck; swap as soon as pressure drops
- Heads-up: Never operate with a compromised HEPA seal. If you suspect bypass, stop and fix before continuing.
Air Compressors and Pneumatic Controls
Air tools do the finishing work. Dry, oil-free air at steady pressure is non-negotiable for whips and skipper nozzles.
- What to look for:
- Portable gas or electric compressors with clean, dry output
- Water separators and oil coalescing filters; desiccant if needed
- 175 PSI-capable units for headroom; regulate to tool specs
- Foot controls for hands-free on/off and safety
- Why it matters:
- Moisture causes dust to clump and stick
- Oil mist contaminates ducts and can damage liners
Rodders and Push Snakes
When you need to push cameras, pull lines, or navigate tight runs, rodders shine.
- Options:
- FRP (fiber-reinforced polymer) cable for strength with flex
- Conduit rodders for long straight runs
- Use cases:
- Camera pushing and target confirmation before opening access
- Pulling whips/lines through complex paths without damage
IAQ and Compliance Tools
A professional result includes measurement, documentation, and when appropriate, third-party testing.
- Helpful tools:
- Air sampling pumps and microbiological test kits (use accredited labs; maintain chain-of-custody)
- Endoscopes and inspection mirrors for quick peeks
- Manometers for verifying negative pressure during cleaning
- Particle counters for QA snapshots pre/post (informational, not medical)
- Heads-up: Don’t diagnose health conditions. Present findings, document clearly, and recommend appropriate remediation or medical consultation when needed.
Featured Systems to Compare (Examples)
Every market has its favorites. Here’s how these commonly discussed systems are typically positioned. Always check current specs, accessories, and compliance in your region.
BrushBeast DR (Black and Red Editions)
- An integrated brush-and-vac style system popular for residential.
- Easy to transport, single-operator friendly, and approachable for add-on service providers.
- Best for light to moderate dust in smaller systems.
- Pair with a true negative air machine if you want whole-system capture and stronger suction.
RamAir Duct Cleaning Systems
- A positive-pressure/hybrid approach that uses clear plates and air-driven agitation to move debris toward capture.
- Minimal cutting, fast setup, and great visual proof.
- Works best when complemented by negative pressure to ensure fine dust goes into HEPA rather than back into the space.
SaniJet Duct Sanitizing System
- A targeted, directional application tool for post-clean treatments where labels allow.
- Reduces overspray and helps you hit surfaces intentionally.
- Remember: clean first, then treat if appropriate and only as labeled.
OzoGen High Output Ozone Generators
- High-output ozone units for unoccupied odor remediation.
- Effective on tough smoke and animal odors when used correctly.
- Strict safety protocols, re-entry times, and ventilation are mandatory.
- Not a duct cleaning tool and not a sanitizer for occupied spaces.
Zephyr: Air Duct Cleaning Machines
- Compact negative air units aimed at portability with true HEPA filtration.
- A good fit for apartments, condos, and jobs with limited power and access.
- Look for sealed cabinets, multi-stage filters, and solid static pressure performance.
DuctMaster 3
- A portable power vacuum that often pairs with rotary agitation tools.
- Favored by teams that want a combined approach without a truck mount.
- Best for residential and light commercial with smart access planning.
Truckmaster 2
- A truck/van-mounted power vacuum solution for higher-volume operations.
- Strong airflow and long hose runs for larger buildings.
- Requires vehicle integration and a higher starting budget.
TurboMax 2 and TurboMax 3
- High-performance portable negative air machines designed for robust suction and long duct runs.
- Look for 12″ inlets, multi-stage filtration, and durable frames that handle daily loading and stairs.
Vent Vac 3 and Vent Vac 3 Dryer Vent
- Portable vac solutions built with duct and dryer vent service in mind.
- Handy for teams that bundle HVAC cleaning with dryer vent safety work.
- Check for specialized adapters and whip compatibility.
aiR+ Air Duct Cleaning Equipment
- A line of portable negative air machines known for multi-stage filtration and user-friendly maintenance.
- Popular with residential service companies expanding into ducts.
- Confirm true HEPA and sealed design.
Cyclonic PowerVac Portable Vacuum Systems
- Cyclonic separation helps reduce filter loading while maintaining suction.
- Heavier units with strong performance for extended runs.
- Ideal when you want portable power without jumping to a truck mount.
ICS Industrial Brush Machines (ATEX): Fortex, Protub, Steel Brush
- Industrial brush systems built for heavy-duty environments and, in some cases, ATEX-rated areas.
- Excellent for large-diameter metal ducts, heavy deposits, and industrial safety requirements.
- Ensure your site’s zone classification matches equipment ratings.
Tecai Systems: Proair, Rotair, Multibot, Visiobot
- Robotic and semi-robotic platforms with integrated brushes and cameras for large or complex ductwork.
- Great for inspection, documentation, and cleaning beyond simple line-of-sight.
- Training recommended; build it into your bid.
Tegras Kitchen Ductwork Systems: Eon, Forte, Extreme Grease
- Purpose-built for kitchen exhaust and grease duct cleaning.
- Different chemistry and techniques than HVAC supply/return.
- If you do hood work, these systems are designed for that world—don’t cross-apply assumptions.
Numatic HEPA and Wet Vacs: HZD570-2, RSB140, WVD570/WVD900
- Reliable HEPA and wet vacs for jobsite cleanup, spot extraction, and water removal.
- Not a replacement for a duct negative air machine, but excellent companions for keeping mechanical rooms and work areas clean and safe.
How to Choose the Right Setup
Picking your stack is about matching method, material, and market. Start with your typical job mix, then build up thoughtfully.
Capacity and Performance
Think in terms of real-world suction through filters and hose, not just peak specs.
- Consider:
- CFM under load and static pressure capability
- 8–12″ hose compatibility and airtight cuffs
- Multi-stage filtration with easily swapped pre-filters
Filtration and Compliance
True HEPA (99.97% at 0.3 microns) in a sealed cabinet is the standard for source removal. Align with NADCA guidance; in the UK/EU, check BESA/TR19 and local equivalents. In industrial or hazardous environments, confirm ATEX zoning and equipment ratings.
Methodology: Negative Air vs Positive Pressure vs Hybrid
- Negative air: Gold standard for pulling debris toward HEPA as you agitate
- Positive pressure: Useful in certain scenarios, but control capture carefully
- Hybrid: Many pros brush under negative pressure, then finish with air whips
Duct Sizes and Materials
Residential ranges commonly span 100–800 mm (4″–32″) round and a mix of rectangular trunks.
- Plan:
- Brush and whip heads sized for both circular and rectangular runs
- Softer tools for flex and lined ducts; stiffer for metal trunks
- Access panels sized to your hose and tool heads
Power and Portability
Your sites dictate your power choices.
- Options:
- Electric portable units for homes and small commercial
- Gas compressors for remote air power (vented outdoors, mind CO)
- Van/truck-mounts for volume and long runs
- Consider:
- Footprint, stair handling, and total weight when fully loaded
Inspection and Documentation
Bake proof into your process.
- Must-haves:
- Camera integration with time-stamped before/after
- Manometer snapshots of negative pressure during work
- Simple reporting templates you can hand to clients and GCs
Warranty, Support, and After-Sales Protections
You’re buying a relationship as much as a machine.
- Look for:
- Readily available filters, brushes, and wear parts
- Phone tech support that actually answers
- Clear warranty terms and realistic turnaround on repairs
- Training resources and onboarding support
Budget Tiers and Packages
There’s a path in at nearly every budget. The key is knowing what each tier can and cannot do so you set expectations—and bids—correctly.
Starter kits under $5,000
Great for add-on providers (carpet cleaners, facility teams) testing the waters, or as a second crew kit.
- Typically includes:
- Entry rotary brush/whip package, basic camera, and containment
- Smaller portable negative air or hybrid/positive-pressure setup
- What you can tackle:
- Light residential dust, short runs, and maintenance cleans
- Heads-up: Plan to upgrade suction and filtration as volume grows.
Mid-range (4,095–4,095–5,195 typical)
Yes, there’s overlap with “starter”—this band reflects value bundles that punch above their price.
- Typically includes:
- True HEPA portable negative air with 8–12″ hose
- Rotary brush kit plus air whips and a dry, filtered compressor
- Better access/containment, spare pre-filters, and a recording camera
- What you can tackle:
- Most residential systems and light commercial day work
Premium ($4,845+ and truck-mounted options)
This tier begins with stronger portables and climbs into van/truck-mounted power vacs for larger projects.
- Typically includes:
- High-static negative air, cyclonic separation, long-hose capability
- Expanded brush/whip head sets, advanced cameras, and QA tools
- Options for robotic inspection/cleaning and kitchen exhaust systems
- What you can tackle:
- Large homes, multi-zone systems, and commercial/light industrial
- Heads-up: Make sure your vehicle power, storage, and crew training match the step up.
Financing and Tax Advantages
There’s no need to buy everything day one. Most suppliers offer financing, and many pros lease equipment to match cash flow to booked jobs.
- Smart moves:
- Equipment financing spreads cost over 36–60 months, preserving cash
- Bundle filters/consumables into monthly plans to stabilize expenses
- Discuss Section 179 deductions with your CPA—many purchases can be expensed in the year of acquisition
- Track utilization and add-on rates; those two levers drive ROI more than anything
Step-by-Step Workflow and Best Practices
Today I want to walk you through a clean, repeatable workflow you can run on any job—residential, commercial, or industrial—so you finish faster, control dust better, and document results your clients can see. Think of this as your on-site playbook: clear steps, smart checks, and simple proof.
- Quick map of the flow:
- Pre-Inspection and Testing
- Access Creation and Sealing
- Pressure Setup (negative air, positive, or hybrid)
- Agitation (brushes, whips, contact cleaning)
- Particulate Capture and HEPA Filtration
- Sanitizing and Deodorizing (where appropriate)
- Verification and Reporting
- Safety Essentials threaded through every step
Pre-Inspection and Testing
Start with eyes and data. A short camera survey tells you what you’re really dealing with—metal vs. flex, lined sections, long horizontals, tight bends, or evidence of moisture, pests, or construction debris. If the client has air quality concerns, you can add IAQ sampling to create a baseline and set expectations. Time-stamped photos, a quick particle snapshot, and basic static pressure notes become your “before” record and help you choose the right tools before you pull a single register.
- Pre-inspection essentials:
- Cameras, IAQ sampling for baseline and planning
- Note duct materials, size, and condition; flag lined/flex sections
- Document red flags (moisture, microbial signs, rodent activity)
- Capture time-stamped photos/video from key branches and trunks
Access Creation and Sealing
You can’t clean what you can’t reach. Plan your access points so you can work from the farthest runs back toward your collector, then install gasketed, code-compliant panels you can reseal airtight. At the same time, control airflow with duct mask and vent covers so debris goes where you want it—into your hose, not into the room. Done right, access and containment save you time, increase suction at the tool, and keep finished spaces spotless.
- Best practices:
- Cut clean, deburr edges, and install circular or rectangular access panels sized to your tools
- Label every panel; log locations for your report and future service
- Use duct mask rolls and temporary seals to isolate branches and returns
- Protect finishes with drop cloths and zipper walls where needed
Pressure Setup
This is where you set the tone for the whole job. Negative air is the gold standard for pulling debris toward a HEPA filter while you agitate. Positive-pressure cleaning and hybrid methods have their place, but you still need a controlled capture path and proof you’re not redistributing fines. Dial in your machine with fresh pre-filters, confirm tight hose connections, and verify negative pressure with a manometer before you start scrubbing.
- Your options:
- Negative air: connect 8–12″ hose to the return or trunk; verify negative pressure at distant registers
- Positive/hybrid: use clear plates and targeted airflow; ensure HEPA capture at the point of release
- Always stage filters (pre → secondary → HEPA) and monitor pressure drop during the job
Agitation: Brushes, Whips, and Contact Cleaning
Agitation is where the magic happens. On rigid metal, rotary brushes break the bond of caked dust and debris, while air whips and skipper nozzles sweep the fines and hair out of corners and boots. On flex and lined ducts, you’ll lean softer—gentle brush heads, lower speeds, and air-driven tools to avoid scuffing or tearing the inner liner. Work methodically from the farthest runs back toward your collector so you’re always pushing debris downstream into the airflow.
- Field-proven sequence:
- Start at the farthest branch; brush metal runs at controlled speed, soft-brush or whip flex/liner
- Use forward/reverse and speed control to navigate bends without binding
- Finish each section with a reverse whip to pull fines toward the collector
- Keep the compressor air dry and oil-free so dust doesn’t clump or smear
Particulate Capture and HEPA Filtration
All that agitation only matters if you capture what you loosen. Sealed systems, tight cuffs, and staged filtration make the difference between “dusty afternoon” and “clean exit.” Watch your pre-filters; swapping early keeps airflow strong and protects your HEPA so you maintain negative pressure through the longest runs. If you’re in a sensitive or occupied space, an additional air scrubber can quietly collect ambient dust while you work.
- Capture checklist:
- Confirm airtight hose connections and panel seals
- Monitor filter pressure drop; swap pre-filters before performance nosedives
- Bag debris and filters per local rules; keep disposal tidy and documented
Sanitizing and Deodorizing
Cleaning comes first. If odor control or surface sanitizing is appropriate and allowed by the label, use targeted systems like SaniJet or a ULV fogger to apply evenly and avoid over-wetting. Follow dwell times, PPE, and re-entry guidance to the letter. Ozone generators are for unoccupied shock treatments only—effective on stubborn smoke/pet odors when used correctly, but not a duct cleaner or sanitizer and not for occupied use.
- Do it right:
- Use only EPA- or locally registered products labeled for HVAC surfaces
- Apply with SaniJet-style directional systems or controlled ULV fogging after source removal
- Ozone: strict unoccupied protocols, posted signage, timed runs, and thorough ventilation before re-entry
Verification and Reporting
Close strong with proof. A few crisp before/after shots from the same vantage point, a manometer photo showing negative pressure during the run, and a short summary of what you did turn a “trust me” into “I can see it.” Include access panel locations, filter changes, and any repair recommendations you discovered along the way. This report becomes your handoff to the client—and your best marketing for the next job.
- What to include:
- Before/after images and short clips from key branches and trunks
- Negative pressure readings, filter changes, and machine settings
- Access panel locations and sealing method
- Notes and recommendations (damaged flex, missing filters, leaky returns)
Safety Essentials
Safety sits over every step. Treat ozone like the hazardous oxidizer it is, with unoccupied, controlled treatments only. For suspected microbial growth, switch to remediation protocols: containment, negative pressure, and standards-based decisions on clean vs. remove. Wear the right PPE, keep your respirator program legit with fit testing, and use safe access methods when you’re off the ground.
- Non-negotiables:
- Ozone handling: unoccupied spaces, posted warnings, timers, ventilation, and re-entry checks
- Microbial precautions: isolate, maintain negative air, and follow IICRC S520 guidance
- PPE: respirators (P100/HEPA), eye/ear protection, cut-resistant gloves, and proper footwear
- Jobsite safety: lockout/tagout, ladder/tower safety, silica awareness, and housekeeping
Training, Certifications, and Compliance
Training turns good intentions into consistent results. NADCA’s ACR Standard is the playbook for source removal, documentation, and ethics. If you’re in the UK or working with European clients, BESA short courses and TR19 frameworks keep you aligned with local expectations. Kitchen extract and grease work follow different rules than HVAC supply/return systems, and fire damper inspections are their own specialty. Make these credentials part of your growth plan so your team can safely take on more complex work.
- Programs to know:
- NADCA Standards (ACR) for HVAC system cleaning and documentation
- BESA Short Courses for air hygiene and ductwork best practices
- Air Hygiene Operative (AHO) and Air Hygiene Technician (AHT)
- Grease Hygiene Operative (GHO) and Grease Hygiene Technician (GHT)
- Fire Damper Testing and Inspection Training for life safety systems
- PASMA: Towers for Users and Low-Level Access for safe work at height
- Grease and Kitchen Extract Compliance (e.g., TR19 Grease/NFPA 96—check your region)
Industry Use Cases and ROI
Residential jobs reward tidy containment, fast setup, and clear proof. You’ll see great results with a strong portable negative air machine, a thoughtful brush/whip kit, and a simple photo report—the kind of work that earns referrals. In commercial spaces, you’re planning for access, power, and schedule constraints: longer hose runs, off-hours work, and more documentation. Industrial and ATEX environments add zoning, intrinsically safe equipment, and tighter compliance; plan more pre-inspection time and coordinate with site safety teams. Across all three, your ROI comes from consistency—clean outcomes, clean job sites, and clean reports that win repeat business.
- Quick planning cues:
- Residential: 2–4 hours per system with a two-person crew; bundle dryer vent and coil cleaning
- Commercial: schedule off-hours, plan power/parking, document access points for future PMs
- Industrial/ATEX: confirm zone classification, use rated equipment, and follow permit-to-work rules
Lead Generation and Upsells
You’re already inside the system—use that access to solve adjacent problems your clients care about. The camera footage you capture naturally opens the door to dryer vent cleaning, odor control, and simple IAQ upgrades like higher-MERV filters, UV-C, or humidity management. Package these add-ons transparently, price them fairly, and deliver them as part of a well-run visit. That’s how you grow ticket values without feeling “salesy.”
- Easy wins:
- Dryer vent cleaning with airflow verification
- Sanitizing/deodorizing (post-clean) where appropriate and labeled
- IAQ packages: MERV-13 filter upgrades, UV-C, ERVs, and smart filter subscriptions
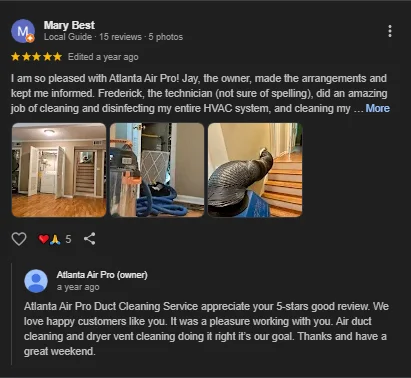
Client Proof and Social Proof
Make your work visible. A lightweight report with before/after photos, a short video walkthrough, and a clear summary of improvements builds confidence and feeds your marketing. If your company has the history, phrases like “Trusted by professionals for 40+ years” set a tone—just be sure they’re accurate. Pair that with real reviews and testimonials, a gallery of job results, and third-party badges so prospects can verify your credibility in a click.
- What to showcase:
- A curated before/after gallery and 30–60 second job recaps
- Verified reviews and testimonials (“Our clients love us”) linked to third-party platforms
- Certifications, training badges, and standards you follow (NADCA, BESA, TR19/NFPA)
- Short case studies with measurable outcomes (reduced dust, improved airflow, odor removal)
If you want, share your typical job mix and region, and I’ll tailor this workflow into a printable checklist—with the exact pre-job photos to capture, the pressure readings to log, and a one-page report template your techs can complete on-site.
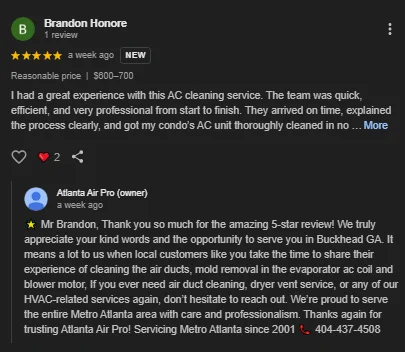
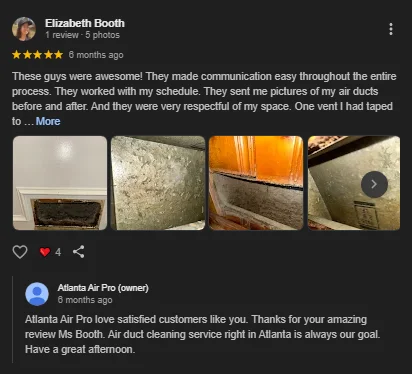
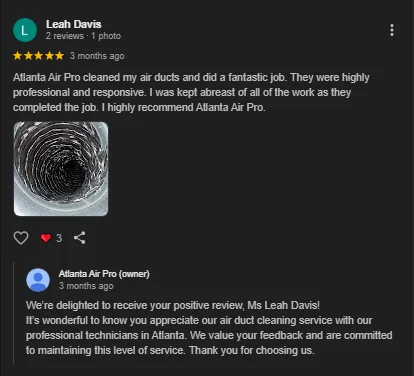
Example Reviews | Airduct Cleaning ATL
How often should ductwork be cleaned?
Residential: Inspect annually; clean every 3–5 years, or sooner after renovations, water damage/mold, pest activity, heavy shedding pets, smoking, or allergy/asthma concerns.
Commercial/industrial: Follow a documented inspection program (e.g., NADCA ACR). Offices typically every 2–4 years; healthcare, manufacturing, or high-particulate sites may require more frequent cleaning.
Dryer vents: Inspect annually; clean at least once a year (more often for multi-family or heavy use).
Will duct cleaning improve indoor air quality?
It can reduce dust, allergens, and debris that circulate in occupied spaces—especially after construction, in homes with pets/smokers, or where ducts are visibly dirty.
It’s most effective when paired with high-MERV filters (MERV 11–13), proper humidity control, sealing duct leaks, and cleaning coils/blowers.
It’s not a cure-all for every IAQ issue (e.g., outdoor pollution, moisture sources), but it’s a key part of a whole-system IAQ plan.
Does duct cleaning make HVAC systems more efficient?
Yes—if buildup is restricting airflow. Removing dust/debris can reduce static pressure, improve airflow, and help the system run closer to design performance.
Biggest efficiency wins also come from sealing duct leaks, cleaning coils and blower wheels, replacing filters on schedule, and balancing the system.
Verify with before/after measurements (static pressure, airflow, temperature split).
Does cleaning eliminate mold and mildew?
Cleaning removes visible growth and contaminated debris, but long-term elimination requires fixing the moisture source (leaks, condensation, high RH).
Use EPA-registered products labeled for HVAC use when sanitizing after physical debris removal; follow label directions and dwell times.
Porous materials (e.g., fiber lining) with mold may require removal/replacement. Avoid ozone in occupied spaces; use only with strict safety protocols when the building is unoccupied.
What signs indicate ducts need cleaning?
Dust puffs or debris at supply registers; visible buildup on grilles that returns quickly after cleaning
Musty or persistent odors, especially when the system starts
Verified mold, pest droppings, nesting materials, or post-renovation dust
Uneven airflow, more frequent filter clogs, or rising energy bills
Dryer vent clue: longer drying times, hot laundry room, burning smell
Why choose positive-pressure or hybrid methods?
Negative air (traditional): Places duct system under negative pressure with HEPA filtration while agitating inside. Great containment for heavy debris; widely accepted under NADCA standards.
Positive pressure: Pushes debris toward a capture point using high-velocity air while locally capturing with HEPA. Faster setups; useful for residential and short runs.
Hybrid (push–pull): Uses both—agitation/positive pressure at registers with a negative-air HEPA unit pulling from the main. Excellent for heavy loading while minimizing cross-contamination.
Choose based on contamination level, duct layout, access points, occupancy constraints, and required containment.
What’s the difference between sanitizing and deodorizing?
Sanitizing/disinfecting reduces microbes on already‑cleaned surfaces with approved products. Deodorizing targets smells and doesn’t necessarily kill microbes.